⚠️ Disclaimer: This tutorial is for educational purposes only. TVBoxFixer.com does not host, distribute, or own any third-party Kodi builds or addons. Users should ensure they have the legal right to access content through any build they install.
I have been testing Kodi builds for a long time now, and Diggz Free99 Kodi keeps coming up in almost every conversation I have with Android TV box users. People ask me about it constantly — and honestly, I get it. The name alone makes you curious.
So I sat down, wiped my test box, and installed it fresh. I went through every screen, every menu, and every scraper so you do not have to guess. This guide shows you exactly how to install Diggz Free99 Kodi in 2026, step by step.
I will also give you my honest personal opinion at the end. No hype, no fluff — just what I actually think after using it on real hardware.
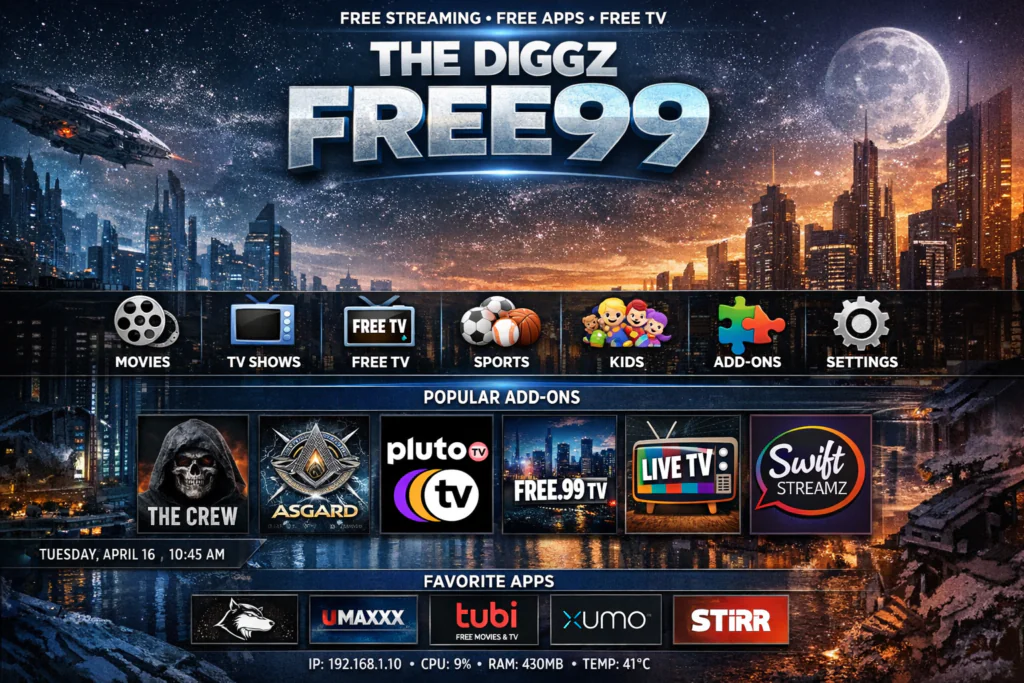
What Is the Diggz Free99 Kodi Build?
Diggz Free99 is a pre-configured Kodi build created by the Diggz team. A Kodi build is different from a single addon. When you install a build, it replaces your Kodi interface with a fully custom skin, pre-loaded addons, and a ready-to-use menu layout.
You do not have to spend hours configuring Kodi yourself. The Diggz team has already done that work. You install the build, and Kodi looks and feels completely different from the default setup.
The Free99 build is designed to be lightweight and beginner-friendly. It is one of their free builds — as the name suggests — which makes it a great starting point if you have never used a Kodi build before.
If you have never set up Kodi at all, I recommend reading my Kodi setup guide for Android TV boxes first. It will save you a lot of confusion.
My First Impression of Diggz Free99 Kodi
When I first launched Diggz Free99 Kodi on my Amlogic S905W box, my first reaction was — okay, this actually looks clean. A lot of Kodi builds feel cluttered and messy. This one does not. The layout is organized and the menu labels are clear even for someone who has never touched Kodi before.
The skin loads fast. I did not experience any of the long splash screens that some heavier builds force you through. It felt responsive right away.
My honest first take? This is one of the better free Kodi builds I have tested in recent months. It does not try to do too much, and that restraint is actually what makes it work well.
Prerequisites Before Installing Diggz Free99 Kodi
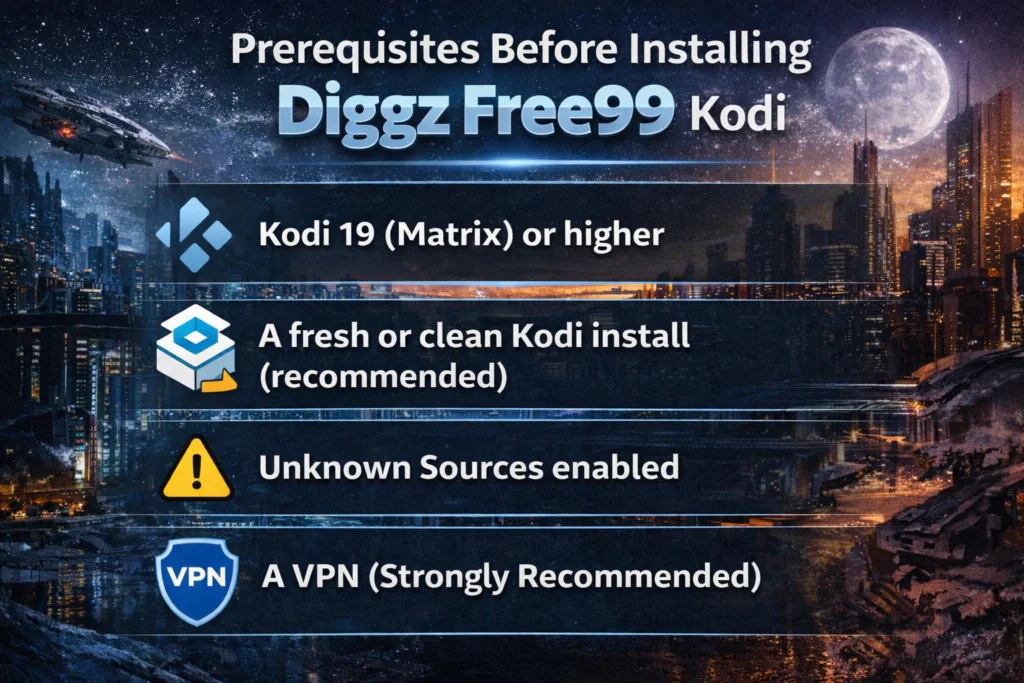
Before you begin, get these four things in order. Skipping any one of them will cause the install to fail or behave strangely.
1. Kodi 19 (Matrix) or higher
Diggz Free99 is built for modern Kodi versions. If you are on anything older than Kodi 19, update first. Grab the latest version for free at kodi.tv/download.
2. A fresh or clean Kodi install (recommended)
Installing a new build on top of an old one can cause conflicts. I always recommend doing a clean install or using the Diggz Maintenance tool to wipe your existing data. I will show you how in a moment.
3. Unknown Sources enabled
This is required. Without it, Kodi will not let you install anything from outside the official Kodi repository. I cover how to enable it in Step 1.
4. A VPN (Strongly Recommended)
Kodi builds connect to third-party scraper services that can see your IP address. Protect your privacy by connecting to a VPN before you start. See my guide on best VPNs for Android TV boxes if you need a recommendation.
Step 1 — Enable Unknown Sources
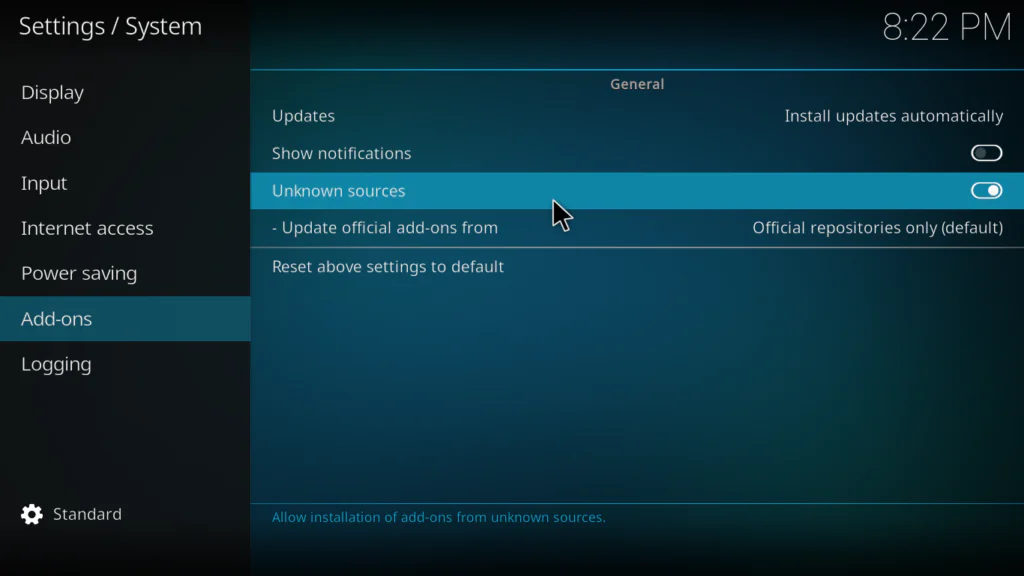
- Open Kodi on your device.
- Click the Settings gear icon on the home screen.
- Go to System.
- Click Add-ons from the left menu.
- Toggle Unknown Sources to ON.
- A warning dialog will appear. Click Yes to confirm.
You only need to do this once. Kodi saves the setting permanently.
Step 2 — Add the Diggz Repository Source

- Go back to the Settings gear icon on the home screen.
- Click File Manager.
- Double-click Add Source.
- Click <None> in the dialog box that opens.
- Enter the Diggz repository URL:
https://nebulous42069.github.io/diggz/- Click OK.
- Name the source Diggz in the name field.
- Click OK to save.
Take your time typing the URL. One wrong character and the next step will fail.
Step 3 — Install the Diggz Repository
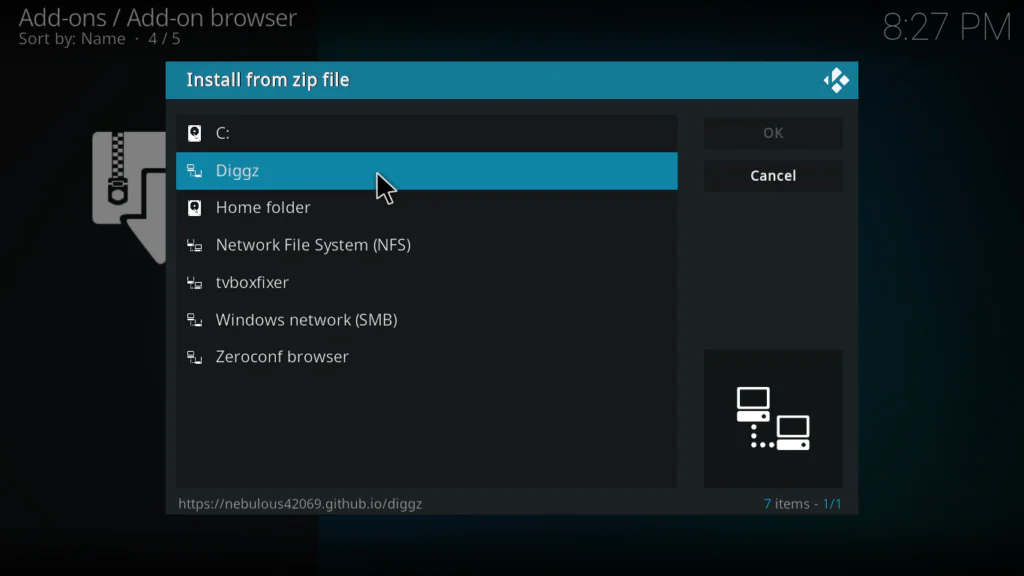
- Return to the Kodi home screen.
- Click Add-ons in the left sidebar.
- Click the open box icon at the top left corner.
- Select Install from zip file.
- Find and click the Diggz source you just added.
- Select the zip file — it will be named something like repository.diggz.zip.
- Wait for the Add-on installed notification in the bottom right corner.
Step 4 — Install the Diggz Wizard
The Diggz Wizard is the tool you use to actually install the Free99 build. Think of it as the installer program that handles everything for you.
- Click the open box icon again.
- Select Install from repository.
- Find and click Diggz Repository.
- Click Program add-ons.
- Find Diggz Wizard in the list.
- Click Install.
- Wait for the Diggz Wizard Add-on installed notification to appear.
Once the wizard is installed, it will usually launch automatically and show you a welcome screen. If it does not, find it inside your Program Add-ons and open it manually.
Step 5 — Installing Diggz Free99 Kodi Build Through the Wizard
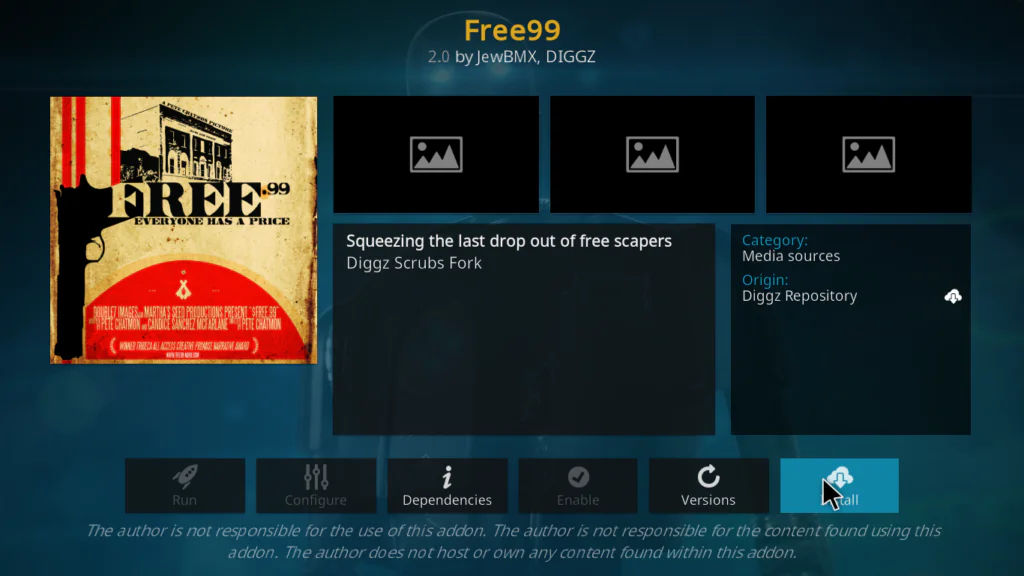
- Open the Diggz Wizard from your Program Add-ons.
- On the Wizard home screen, click Builds.
- Browse the available builds and find Free99.
- Click on Free99.
- The wizard will ask if you want a Fresh Install or a Standard Install.
- I always recommend choosing Fresh Install. This wipes your old Kodi data and gives you a clean slate. It prevents conflicts with old skins or settings.
- Confirm by clicking Fresh Install when prompted.
- The wizard will download and apply the build. This can take between 1 and 5 minutes depending on your internet speed.
- When it finishes, Kodi will automatically restart and relaunch with the Free99 build active.
Do not touch anything while the build is downloading and applying. Interrupting the process can corrupt your Kodi install.
What to Do After Installing Diggz Free99 Kodi
When Kodi relaunches with the Free99 build, it will look completely different. Give it a few minutes on the first boot. It needs to initialize all the included addons and scrapers before everything is ready.
I would also suggest going into the Settings menu inside the build and connecting your Real-Debrid or Premiumize account if you have one. This dramatically improves the quality of sources the included addons can find.
If you do not have either of those services, the build still works — but you will notice a difference in the number of available sources compared to a debrid-connected setup.
Protect Your Privacy When Using Diggz Free99 Kodi
Kodi builds connect to multiple external services the moment you start using them. Scrapers, metadata providers, and addon update servers all make outgoing connections from your device.
None of this is unusual or dangerous on its own. But it does mean your IP address is visible to those external services. If you care about your privacy — and you should — connect to a VPN before launching Kodi.
A good VPN for Android TV boxes should have a native Android TV app, fast servers, and support for WireGuard or OpenVPN protocol. Read Kodi’s official guidance on addon safety at kodi.wiki if you want to understand more about how Kodi handles external connections.
Troubleshooting Diggz Free99 Kodi Problems
The Diggz Source Is Not Loading Any Zip Files
Go back to File Manager and confirm the URL is entered as https://nebulous42069.github.io/diggz/ with no spaces or typos. Delete the old source and re-add it if needed.
Diggz Wizard Is Not Showing the Free99 Build
The wizard pulls its build list from the internet. Check your internet connection and reopen the wizard. If the list is still empty, try restarting Kodi and reopening the wizard.
Build Downloaded but Kodi Did Not Restart
Close Kodi completely from your Android TV launcher. Force stop it if needed from your device’s app settings. Then reopen Kodi and the build should be active.
Diggz Free99 Kodi Is Running Slowly After Install
On the first boot, the build initializes a lot of addons at the same time. Wait 3 to 5 minutes for everything to settle. If it is still slow after that, check how much free RAM your device has. The Free99 build needs at least 1.5GB of free RAM to run comfortably. Check my guide on fixing slow performance on Android TV boxes for more tips.
My Personal Opinion on Diggz Free99 Kodi
Okay, here is my honest take — and I am not going to sugarcoat anything.
Diggz Free99 Kodi is genuinely good for what it is. If you are someone who just wants Kodi to be ready out of the box without spending hours configuring it yourself, this build delivers exactly that. The interface is clean, the layout makes sense, and it does not crash or freeze the way some over-stuffed builds do.
But I will also say this: it is not a magic solution. The quality of what you find through any Kodi build depends heavily on the scrapers working that day, your internet speed, and whether you have a debrid service connected. No build changes that reality.
What I actually like most about Free99 is the skin itself. It feels modern. It does not look like a project from 2015 that someone forgot to update. For a free build, that is actually impressive.
What I like less: the build includes more addons than most users will ever need. Several of them are duplicates of each other. I would prefer a leaner setup with fewer, better-maintained addons — but I understand the Diggz team is trying to make sure everyone finds something that works for their region.
My overall verdict? If you are setting up Kodi for the first time and want to skip the manual configuration stage, install Diggz Free99 Kodi. It is a solid starting point. Just know going in that you will eventually want to clean it up and keep only the addons that actually work for you.
Rating: 4 out of 5. Clean design, easy install, slightly overcrowded with addons — but still one of the best free Kodi builds available in 2026.
Final Verdict — Should You Install Diggz Free99 Kodi?
Yes — especially if you are new to Kodi builds. The Diggz Free99 Kodi build is lightweight enough to run on budget Android TV hardware, easy enough to install in under 10 minutes, and polished enough to actually enjoy using day to day.
It is not the absolute best Kodi build I have ever tested, but it is one of the most consistently reliable free builds available right now. The Diggz team has a good reputation for maintaining their repository and keeping builds updated, which matters more than most people realize when they are choosing a build.
Give it a shot. If it does not click for you, you can always wipe it and go back to a clean Kodi install. That is the beauty of Kodi builds — nothing is permanent.
If you found this guide helpful, share it with someone who is just getting into the Android TV box world. And if you have questions or run into issues, drop them in the comments below. I read every single one.