How to update X96 Mini firmware is something every X96 Mini owner needs to know — especially when the device starts freezing, crashing, or running slower than it used to.
I’ve personally updated firmware on multiple X96 Mini units — the 1GB/8GB, 2GB/16GB, and the newer S905W2 variant — and the process is straightforward once you follow the right steps for your exact model.
This guide covers 3 proven methods to update X96 Mini firmware safely: USB Burning Tool (most reliable), SD Card flash (no data cable needed), and OTA update (easiest when available). By the end, your device will be running fresh firmware with no guesswork.
Things to Know Before You Update X96 Mini Firmware
Before you do anything, read this section. It takes two minutes and could save you from a bricked device.
Back up your data first. A full firmware flash wipes everything — apps, Kodi settings, IPTV playlists, saved logins. Export anything important before you start.
Use the correct firmware for your exact model. This is the most critical rule. The X96 Mini was released with different chipsets and RAM configurations. Flashing the wrong firmware causes boot loops. Check the sticker on the bottom of your device before downloading anything.
Never unplug the device mid-flash. A power interruption during flashing can permanently brick the device.
Use a data cable, not a charge-only cable. Many cheap Micro-USB cables are charge-only. If the USB Burning Tool doesn’t detect your X96 Mini, the cable is the first suspect.
Windows PC required for Method 1. The Amlogic USB Burning Tool is compatible with Windows XP, Vista, 7, 8, 8.1, and Windows 10 — but not Mac or Linux. Mac users should use Method 2 (SD Card). Android MTK
X96 Mini Model Variants — Identify Yours First
Most guides skip this step entirely. Don’t.
The X96 Mini shipped in multiple hardware variants over the years. S905W and S905W2 firmware is not interchangeable. Flashing S905W firmware onto an S905W2 device will cause a boot loop — and vice versa.
| Model | Chipset | RAM / Storage | Android |
|---|---|---|---|
| X96 Mini (Standard) | Amlogic S905W | 1GB / 8GB | 7.1 |
| X96 Mini (Standard) | Amlogic S905W | 2GB / 16GB | 7.1 |
| X96 Mini V2 | Amlogic S905W2 | 2GB / 16GB | 11 |
How to confirm your variant: Go to Settings → About Device → Build Number. The build string includes your chipset identifier. You can also check the bottom label of the box for the CPU and RAM listing.
⚠️ If your build number shows “S905W2” — you need the Android 11 firmware package, not the Android 7.1 one most guides link to.
What You Need
Gather everything before starting so you don’t have to stop mid-process.
- ✅ Your X96 Mini device
- ✅ A Windows PC (required for Method 1)
- ✅ A Micro-USB to USB-A data cable (not charge-only)
- ✅ Amlogic USB Burning Tool (free — download from x96mini.com/pages/x96-mini-android-tv-box)
- ✅ The correct .img firmware file for your exact model variant
- ✅ For Method 2: a MicroSD card (8GB minimum, FAT32 formatted)
For firmware files, the official source is x96mini.com/pages/download. The XDA Forums community also maintains a large archive of tested firmware builds at xdaforums.com — search your exact model and chipset.
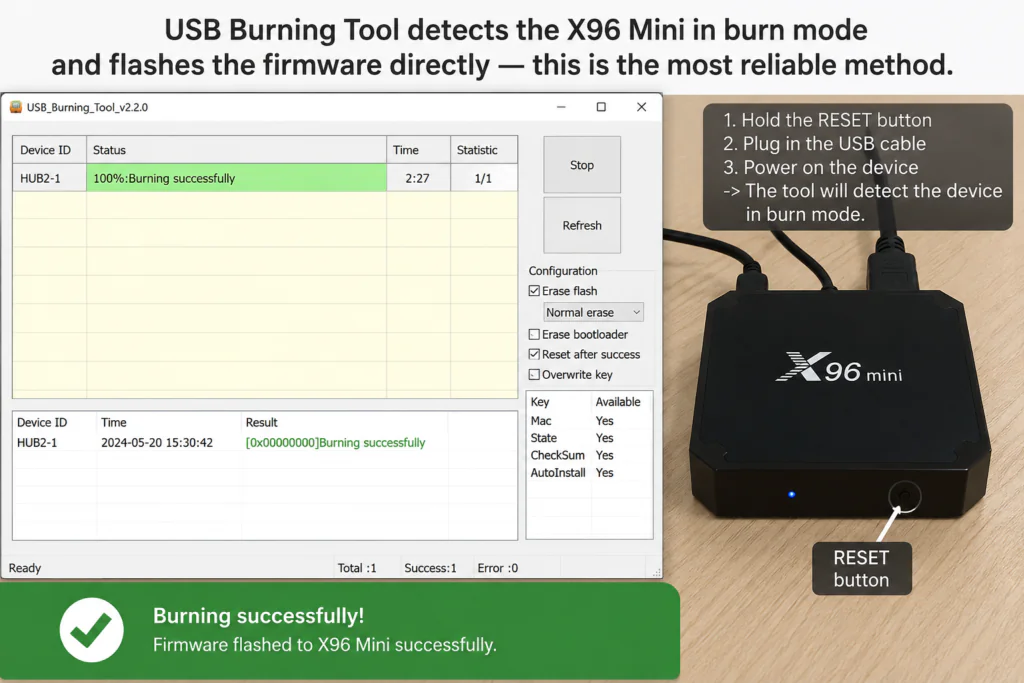
Method 1: How to Update X96 Mini Firmware via USB Burning Tool (Recommended)
This is the best method to update X96 Mini firmware. It works for firmware upgrades, downgrades, device recovery, and installing custom firmware — and can even revive a bricked device by flashing a fresh firmware image. Android MTK
Step 1 — Install the USB Burning Tool
Download and install the USB Burning Tool on your Windows PC. Right-click the .exe and select Run as Administrator — the tool needs admin access to communicate with the USB port correctly.
Step 2 — Load the Firmware File
Click File → Import Image and select the .img firmware file for your X96 Mini model. The tool will verify the file automatically. If it shows an error at this stage, redownload the firmware — the file is likely corrupted or mismatched.
Step 3 — Enable the Erase Options
Check both “Erase Flash” and “Erase Bootloader”. The tool offers several erase options including Normal Erase, Force Erase, Erase All, and Force Erase All. For a clean, problem-free flash, use Normal Erase for both. Skipping these options causes leftover data conflicts that make the device behave erratically after flashing. Android MTK
Step 4 — Enter Burn Mode
- Power off the X96 Mini completely and unplug it from the TV.
- Find the reset pinhole on the side or back of the unit (near the AV port).
- Press and hold the reset button with a toothpick or SIM ejector.
- While holding, plug the Micro-USB cable into the PC.
- Hold for 5–8 seconds until the tool shows “Found One AmlUsbBurning Device”.
- Release the reset button.
💡 Tip from the community: With newer versions of the USB Burning Tool, click Start before attaching the USB cable to the TV box, then push and hold the reset button while inserting the cable — the tool should recognize the device almost immediately. atvXperience
Step 5 — Start the Flash
Click Start. The progress bar will begin moving. Do not disconnect the device, cable, or PC during this process.
Step 6 — Wait for Completion
The process takes 5–15 minutes. When done, the tool shows a green “Burning Success” message. Unplug the Micro-USB cable and reconnect the device to power normally.
⚠️ If the progress bar freezes for more than 5 minutes, click Stop, unplug the device, and restart from Step 4. Never force-close the tool while flashing is in progress.
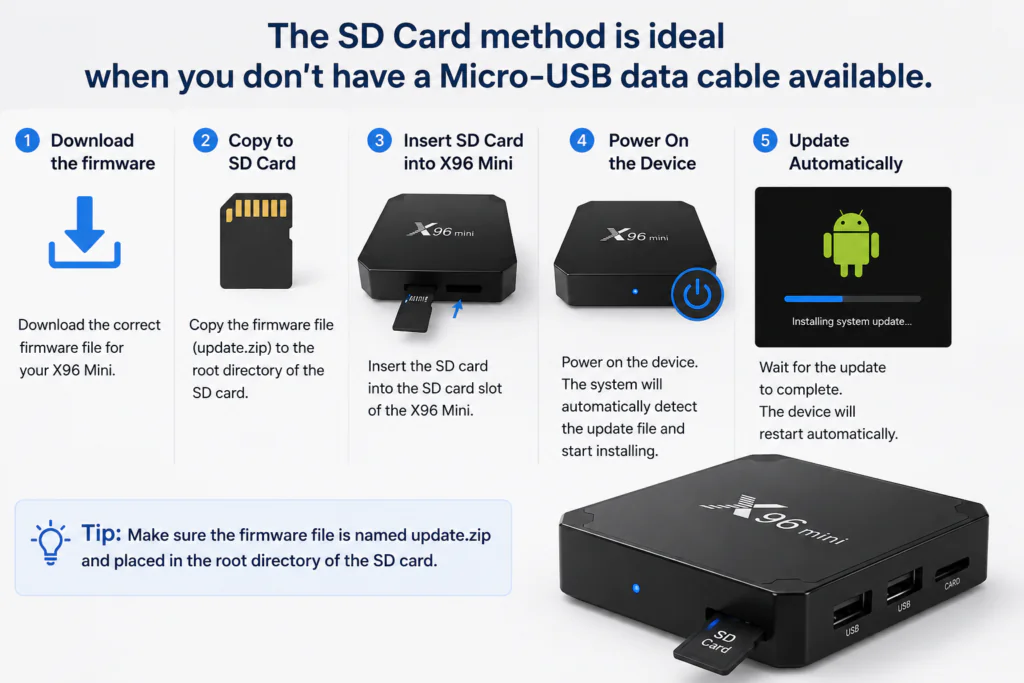
Method 2: Update X96 Mini Firmware via SD Card
No data cable? Use this method. The USB/SD recovery method uses the built-in bootloader recovery, requires no PC during the flash itself, and works by copying a single .img file to FAT32-formatted media, then holding the AV port reset button while powering on. Alibaba
- Format a MicroSD card (8GB minimum) to FAT32. On Windows, cards larger than 32GB won’t show FAT32 as an option — use the free tool guiformat to force it.
- Copy your .img firmware file to the root of the SD card (not inside any folder).
- Rename the file exactly:
aml_upgrade_package.img— spelling and capitalization must be exact or the device won’t detect it. - Eject the SD card safely and insert it into the X96 Mini while the device is powered off.
- Hold the reset button (pinhole near the AV port) and power on the device. Hold for 5 seconds.
- Release — the device detects the card and begins flashing automatically.
- Wait for the process to complete. The device restarts on its own when done.
If this fails on the first attempt, try a different MicroSD card. Low-quality cards are a common cause of SD card flash failures.
Method 3: OTA Update — Easiest When Supported
Some X96 Mini firmware versions support OTA (Over-the-Air) updates — the device downloads and installs the update directly without a PC or SD card.
How to check:
- Go to Settings → About Device
- Tap System Update or Check for Updates
- If an update is available, follow the on-screen instructions
When OTA won’t work:
Many X96 Mini units run unofficial or custom firmware that no longer connects to an OTA server. The “Check for Updates” button will return “No update available” even when newer firmware exists. In that case, use Method 1 or Method 2.
OTA updates also only work for official stock firmware. If you want to install a custom ROM like SlimBOX ATV9, you must use Method 1. See our guide: How to Flash X96 Mini with SlimBOX ATV9 Custom Firmware.
Common Problems When You Update X96 Mini Firmware
Device Not Detected by USB Burning Tool
- Swap the Micro-USB cable first — most detection failures are caused by charge-only cables. Test the cable by plugging in your phone and checking if it appears in File Explorer.
- Try a direct motherboard USB port — avoid front-panel ports and USB hubs.
- Reinstall the Amlogic USB driver. Open Device Manager while the X96 Mini is in burn mode, find the unknown device, and install the driver manually from the USB Burning Tool folder.
- Run the tool as Administrator.
Device Stuck on Boot Logo After Flashing
Almost always a firmware mismatch. Check your chipset again (S905W vs S905W2) and re-flash with the correct file. The good news: a boot-looping device can still enter burn mode using the reset button — the USB Burning Tool detects it at hardware level regardless of whether Android boots.
Progress Bar Freezes or Flash Fails
- Redownload the firmware file — partial downloads produce corrupted .img files that fail silently.
- Confirm both erase options are checked.
- Re-enter burn mode and try again. A second attempt resolves most mid-flash failures.
Device Won’t Enter Burn Mode
- On some X96 Mini batches, the reset contact is inside the AV port itself, not a separate pinhole. Try pressing firmly into the AV port with a toothpick.
- Make sure the device is fully off, not in sleep mode.
- If the device is operational, you can open a terminal app and enter “reboot upgrade” — the device will then be ready to receive the update from the USB cable. atvXperience
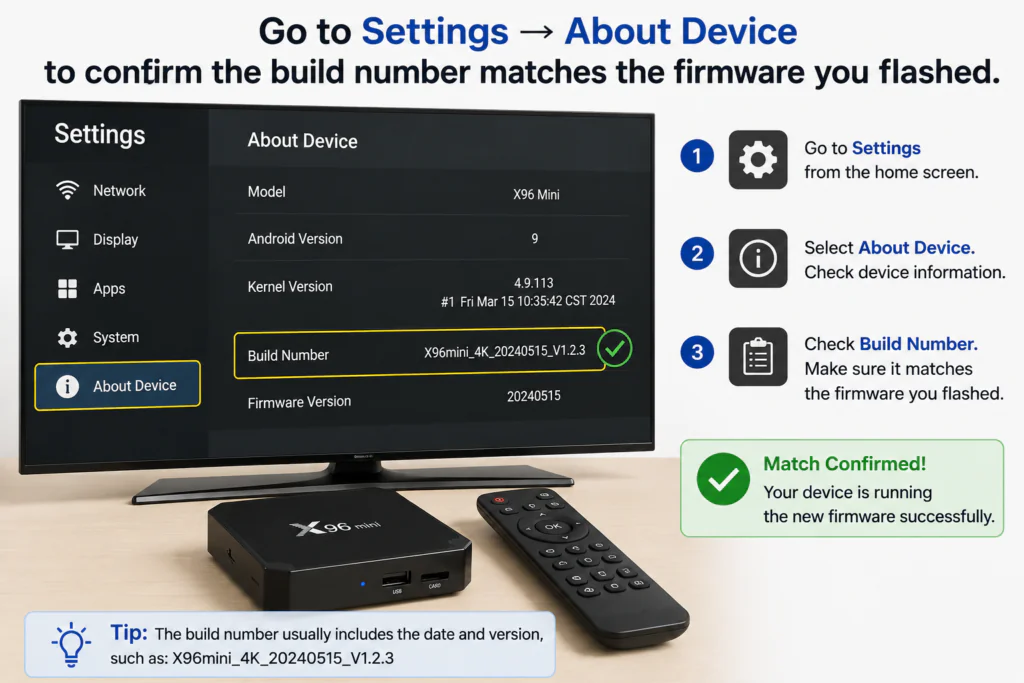
How to Verify the X96 Mini Firmware Update Was Successful
After the device restarts:
- Go to Settings → About Device
- Check the Build Number or Firmware Version
- Compare it with the firmware file you flashed — the build date should match
A successful update typically brings:
- Faster boot times
- Smoother navigation and app performance
- Fewer random crashes and freezes
- Improved Wi-Fi stability (firmware often includes updated drivers)
If the device feels identical immediately after flashing, give it 10–15 minutes. Background optimization processes run on the first boot and settle down on their own.
When NOT to Update X96 Mini Firmware
Sometimes leaving the firmware alone is the right call.
Skip the update if:
- Your X96 Mini is running well with no issues — firmware updates aren’t mandatory
- You can’t find the exact firmware for your chipset and RAM variant — a wrong flash is worse than old firmware
- You’re running a custom ROM like SlimBOX, CoreELEC, or LibreELEC — stock firmware will overwrite your entire setup
- You don’t have time to troubleshoot — always do this when you have an hour to spare
🌡️ If the device was overheating before the update, a firmware flash alone may not fix it. Check our X96 Mini Overheating Fix guide for hardware-level solutions.
Also check: Why Is My TV Box So Slow? — some slowness issues are software-related, not firmware-related.
Conclusion
Now you know exactly how to update X96 Mini firmware using three different methods — and what to do when something goes wrong.
Quick recap:
- ✅ Confirm your exact model variant (S905W or S905W2) before downloading anything
- ✅ Check OTA first in Settings → About Device — it’s the easiest path when it works
- ✅ Use Method 1 (USB Burning Tool) for the most reliable full flash
- ✅ Use Method 2 (SD Card) if you don’t have a Micro-USB data cable
- ✅ Verify success in Settings → About Device after reboot
Take your time with each step and your X96 Mini will feel like a new device when it’s done.
Frequently Asked Questions
Q: How do I update X96 Mini firmware? Download the correct .img firmware file for your X96 Mini variant (verify your chipset in Settings → About Device). Use the Amlogic USB Burning Tool on a Windows PC — enter burn mode with the reset button, load the firmware, check both erase options, and click Start. Full instructions are in Method 1 above.
Q: Is it safe to update X96 Mini firmware? Yes, when done correctly. The main risk is using firmware that doesn’t match your device variant. Always verify your chipset (S905W or S905W2) before downloading. Even a failed flash can usually be fixed by reflashing with the correct file — only a power cut mid-flash causes permanent damage.
Q: What is the latest X96 Mini firmware? There is no single latest version. For stock firmware, check the official download page at x96mini.com. For community-tested builds, search your exact model on XDA Forums. The S905W2 variant supports Android 11, while the original S905W tops out at Android 9 with custom ROMs.
Q: Can I update X96 Mini firmware without a PC? Yes — use Method 2 (SD Card). Prepare the card on any computer, rename the file to aml_upgrade_package.img, insert it into the powered-off device, and hold the reset button while powering on. Some units also support OTA updates directly through Settings → System Update.
Q: Will updating firmware delete everything? Yes. A full flash (Methods 1 and 2) wipes all apps, settings, and data — it’s effectively a factory reset. Back up your Kodi configuration, IPTV playlists, and any saved logins before flashing. OTA updates (Method 3) typically preserve your data.
Q: My X96 Mini is stuck in a boot loop — can I still update the firmware? Yes. This is actually one of the best use cases for the USB Burning Tool. A boot-looping device can still enter burn mode using the reset button, because the tool communicates at hardware level — independent of whether Android boots. Flash the correct firmware and the device will be fully restored.
Q: How long does an X96 Mini firmware update take? Via USB Burning Tool: 5–15 minutes depending on your PC and firmware file size. Via SD Card: similar time, but varies by card speed. OTA updates typically take 10–30 minutes including download time.


